219 Floor-Ceiling Vaults**
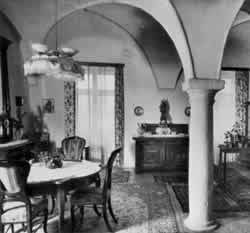 |
. . . we have already discussed the fact that ordinary joist floors and slab floors are inefficient and wasteful because the tension materials they use to resist bending are less common than pure compression materials - Efficient Structure (206), Good Materials (207), and that it is therefore desirable to use vaults wherever possible. This pattern gives the shape and construction of the vaults. The vaults will help to complete Floor and Ceiling Layout (210), and Perimeter Beams (217); and, most important of all, they will help to create the Ceiling Height Variety (190) in different rooms.

We seek a ceiling vault shape which will support a live load on the floor above, form the ceiling of the room below, and generate as little bending and tension as possible so that compressive materials can be relied on.
The vault shape is governed by two constraints: the ceiling cannot be lower than about 6 feet at the edge of the room, except in occasional attic rooms; and the ceiling in the middle of the room should vary with the room size (8 to 12 feet for large rooms, 7 to 9 feet for middle sized rooms, and 6 to 7 feet for the very smallest alcoves and corners - see Ceiling Height Variety (190).
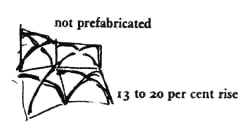
We know, from structural considerations, that a circular shell dome will generate virtually no bending moments when its rise is at least 13 to 20 per cent of its diameter. (This is established in studies and tests of shell structures, and is corroborated by our own computer studies.) For a room 8 feet across, this requires a rise of about 18 inches, making a total height of 7 to 8 feet in the middle; for a room 15 feet across, it requires a rise of 2-3 feet, making a height of 8 to 10 feet in the middle.
Luckily, these vault heights are just congruent with the needed ceiling heights. We may say, therefore, that the ideal - vault for an inhabited space is one which springs from 6 to 7 feet at the edge, and rises 13 to 20 per cent of the smaller diameter.
There are various possible ways of making a circular or elliptical vault spring from a square or rectangular room.
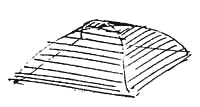
1. One type of vault is made by arching diagonal ribs from corner to corner; and then spacing straight line elements across the ribs.
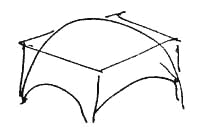
2. Another type is a pure dome supported on squinches.
3. Another is based on a rectangular grid of arched ribs. The edge ribs are entirely flat, and the center ribs have the greatest curvature. In the end, each part of the vault is curved in three dimensions, and the corners are slightly flattened.
Each of these three vaults makes sense in slightly different circumstances. The first is the easiest to conceive, but it has a slight structural disadvantage: its surface panels are curved in one direction only - because they are made of straight line elements - and cannot therefore achieve the strength of a doubly curved vault. The second is the hardest to conceive; however, it comes naturally from the intersection of a spherical shape and a rectangular one. If one were to make a vault by using a balloon as a form, pushed up within the perimeter beams, the second type would be the easiest to use. In the particular building technique we have been using, the third type is easiest to use, because it is particularly simple to lay out the arched ribs which provide the formwork. It flattens out at the corners, which could create bending moments and require tension materials. However, in lightweight concrete we have found that it does not require any more than the shrinkage reinforcement, which is needed anyway.
We shall now describe a very simple way of making a vault. Bear in mind that we considered it essential that the vault be built up gradually, and that it could be fitted to any room shape, without difficulty. This technique is not only cheap and simple. It is also one of the only ways we have found of fitting a vault to an arbitrary room shape. It works for rectangular rooms, rooms that are just off-rectangles, and odd-shaped rooms. It can be applied to rooms of any size. The height of the vault can be varied according to its position in the overall array of ceiling heights and floors - Ceiling Height Variety (190), Structure Follows Social Spaces (205), Floor and Ceiling Layout (210).
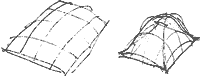
First, place lattice strips at one foot centers, spanning in one direction, from one perimeter beam to the opposite perimeter beam, bending each strip to make a sensible vault shape. Now weave strips in the other direction, also at almost one foot centers, to form a basket. The strips can be nailed onto the form of the perimeter beam around the room. You will find that the basket is immensely strong and stable.
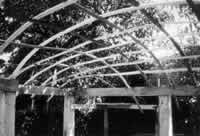 |
| Lattice strips in position. |
Now stretch burlap over the lattice strips, tacking it on the strips so it fits tightly. Paint the burlap with a heavy coat of polyester resin to stiffen it.
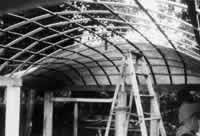 |
| Burlap over the lattice work. |
The burlap-resin skin is strong enough to support 1 to 2 inches of lightweight concrete. In preparation for this, put a layer of chicken wire, as shrinkage reinforcement, over the stiffened burlap. Then trowel on a 1- to 2- inch layer of lightweight concrete. Once again, use the ultra-lightweight 40-60 pound concrete described in Good Materials (207).
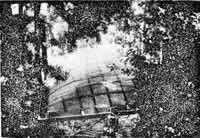 |
| Resin over burlap. |
The shell which forms is strong enough to support the rest of the vault, and the floor above.
 |
| Lightweight concrete on. |
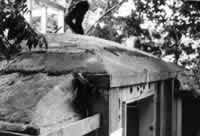
The rest of the vault should not be poured until all edges are in, columns for the next floor are in position, and ducts are insee Box Columns (216), Duct Space (229). In order to keep the weight of the vault down, it is important that even the ultralightweight concrete be further lightened, by mixing it with 50 per cent voids and ducts. Any kind of voids can be used - empty beer cans, wine jugs, sono tubes, ducts, chunks of polyurethane. Or voids can be made very much like the vaults themselves by making arches with latticing between columns and then stretching burlap from these arches to the dome. The drawing below shows the sequence of construction.
|
One version of a floor-ceiling vault, made of thin wooden lattice strips woven like a basket, burlap, resin, chicken- wire and ultra lightweight concrete. |

A 16 by 20 foot vault similar to the one shown in our photographs has been analyzed by a computerized finite element analysis. The concrete was assumed to be 40 pounds perlite, with a test compressive strength of 600 psi. Tensile strength is taken as 34 psi, and bending as 25.5 inch pounds per inch. These figures are based on the assumption that the concrete is unreinforced. Dead loads were figured at 6o pounds per square foot assuming 50 per cent voids in the spandrels of the vault. Live loads were taken to be 50 pounds per square foot.
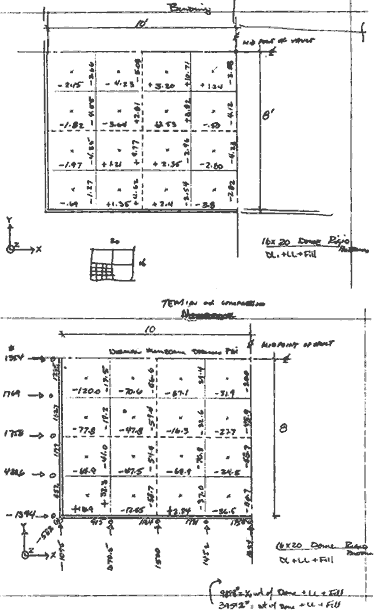
Results of computer analysis.
According to the analysis, under such loading the largest compressive stress in this dome occurs near the base at mid points of all four sides and is 120 psi. Outward thrust is the greatest at quarter points along all four walls, and is 1769 pounds. The maximum tension of 32 psi occurs at the corners. Maximum bending is 10 inch pounds per inch. All of these are well within the capacity of the vault, and besides, shrinkage reinforcement in the vault will make it even stronger.
The analysis shows, then, that even though the vault is an impure form (it contains square panels which are actually sagging within the overall configuration of the vault shape), its structural behavior is still close enough to that of a pure vault to work essentially as a compression structure. There are small amounts of local bending; and the corner positions of the dome suffer small amounts of tension, but the chicken wire needed for shrinkage will take care of both these stresses.
Here are some other possible ways of building such a vault:
To begin with, instead of wood for the lattice work, many other materials can be used: plastic strips, thin metal tubes, bamboos. Other resins besides polyester resins can be used to stiffen the burlap. If resins are unavailable, then the form for the vault can be made by placing lattice strips as described, and then stretching chicken wire over it, then burlap soaked in mortar which is allowed to harden before concrete is placed. It might also be possible to use matting stiffened with glue, perhaps even papier mache. It is possible that similar vaults could be formed by altogether different means: perhaps with pneumatic membranes or balloons. And it is of course possible to form vaults by using very traditional methods: bricks or stones, on centering, like the beautiful vaults used in renaissance churches, Gothic cathedrals, and so on.
Therefore:
Build floors and ceilings in the form of elliptical vaults which rise between 13 and 20 per cent of the shorter span. Use a type of construction which makes it possible to fit the vault to any shaped room after the walls and columns are in position: on no account use a prefabricated vault.
When the main vault is finished, mark the positions of all those columns which will be placed on the floor above it - Final Column Distribution (213) - Whenever there are columns which are more than 2 feet away from the perimeter beam, strengthen the vault with ribs and extra reinforcing to withstand the vertical forces.
Put all the upper columns in position before you pour the floor of the vault, so that when you pour it, the concrete will pour around the column feet, and anchor them firmly in the same way that they are anchored in the foundations - Root FoundationS (214).
To finish the under surface of the vault paint it or plaster it- Soft Inside Walls (235). As for the floor surface above, either wax it and polish it or cover it with soft materials - Floor Surface (233). . . .
![]()
A Pattern Language is published by Oxford University Press, Copyright Christopher Alexander, 1977.